Peek-a-boo Box
by Brenda Quintana
Create a darling box to showcase small treats.
Supplies
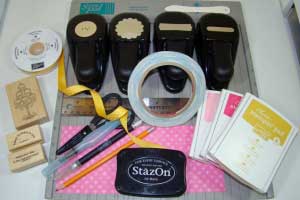
- One piece 4” x 9 1/2” Cardstock or patterned paper
- Scor-Pal™ (or other scoring tool)
- Scor-Tape™ (or other strong adhesive)
- 1 3/8” Circle Punch
- Cutting Mat
- Hobby Blade
- Ruler
- Scissors
- Medium Window Sheet
Step-by-Step
-
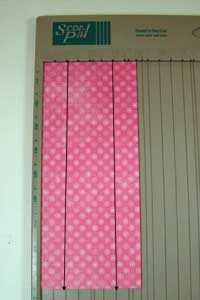
Step 1
Line the piece of 4” x 9 1/2” cardstock or paper with the short side along the top of the Scor-Pal, then score at 1” and at 3”.
-
Step 2
Turn the cardstock so that the 9 1/2” length is at the top of the Scor-Pal.
Score at 1”, 3”, 4” and 6”.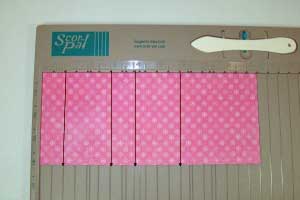
-
Step 3
Keeping the 9 1/2” length along the top of the Scor-Pal, shift the cardstock to the 15/16” mark (between the 7/8” and 1” mark) and score at 8” and 10”.
Note:
If you are not using a Scor-Pal, score cardstock at 7 1/16” and 9 1/16”.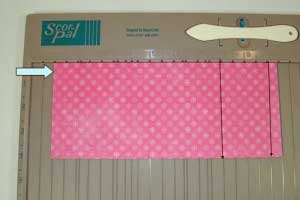
-
Step 4
Keeping your cardstock oriented as it was in step three, cut away the pieces along the score lines as shown.
Scored lines were traced with a black marker for this tutorial. The solid lines indicate additional places to cut. The tab on the far right side is ¾” long.
Note:
Use a ruler and measure, then draw the tab with a pencil to make sure it is centered.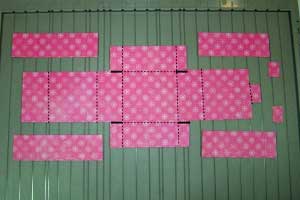
-
Step 5
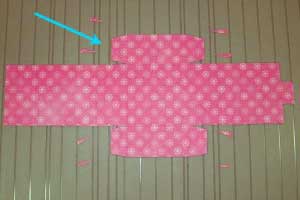
Angle cut each of the four tabs. The blue arrow is pointing to one of the four tabs.
-
Step 6
Cut a centered, 1” slot with a hobby blade on the second score line from the left.
Note:
The black line indicates where the slot should be cut. Use only one stroke of the hobby blade; the slot needs to be narrow.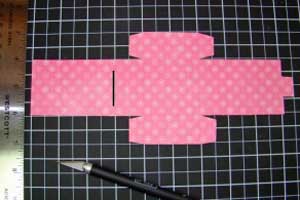
-
Step 7
Punch a 1 3/8” centered circle in the second segment from the left.
Hint:
Draw an ‘X’ from corner to corner with a pencil to help get the circle centered (the blue dotted lines represents the pencil marks).
-
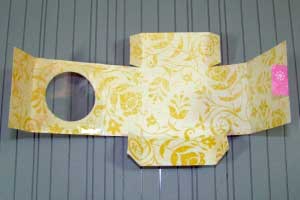
Step 8
Flip the cardstock over to the back side. Apply adhesive around the circular hole as shown.
Remove the adhesive liner and place a piece of window sheet (slightly smaller than 2” x 2”) over the circular hole.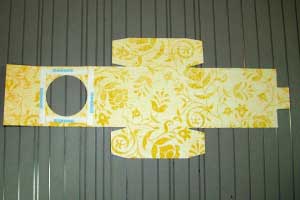
-
Step 9
Flip the cardstock over to the front side.
Apply adhesive on the four tabs as shown.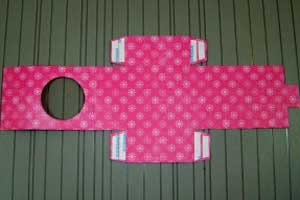
-
Step 10
Flip the cardstock over to the back side and bend the cardstock inwards along score lines.
-
Step 11
Remove the adhesive liner from the four tabs and assemble the bottom of the box.
Tuck in the circular window piece.
Close the lid of the box by slipping the tab into the slot.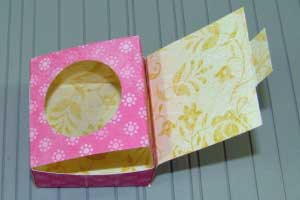
-
Step 12
Embellish your box as desired and fill with a little gift or a sweet treat .

Your Turn
You've seen the tutorial, now you try it! We've got a section of the gallery set aside for Peek-a-boo Box. Try this technique, then upload your artwork to the gallery. Show us your creations!
***Please note - Internet Explorer/Edge is not a supported browser, and will not allow you to see the videos. Please use Chrome, Firefox or Safari to view our tutorial videos.

 *
*
Questions and Comments
We'd love to get your feedback or questions. Leave your comment below.
thanks
Thank you so much for this one.
Thanks for the tutorial.
Thanks for a great tutorial.
Alex x
I too have a cricut, I don't know how to use it to it extent.
How did you make a cut file for this box???? I would love to know how to do more with mine?
Please advise, thanks in advance.
Page 1 of 2 pages 1 2 >